I was just asked how I stamped on the candles.
Goodness, I wish I had enough ambition to tape a tutorial, or take a lot of photos, but it is late...so I'll just try to sum it up in a few paragraphs.
I will basically just sum up what is already said on this site:
http://www.splitcoaststampers.com/resources/tutorials/stamping_on_candles/
Step 1
Stamp on white tissue paper. Use images that can be colored-in or solid images, in the ink color of your choice. For my candle, I dipped my stamp in black Staz-On Ink and then stamped on the tissue paper. This is the outline.
Tip: Stamp extra images on the tissue in case of a mistake.
Step 2
Color in stamped images using some form of coloring medium, but be careful and test the medium used. With Twinkling H2O™s™, you will want to make sure your Aquabrush™ is not very wet but has a fair amount of watercolor on it. If you would prefer not to color just use a solid stamp with your choice of ink.
For my candle - I colored in the image with Stampin-Write Markers (Stampin Up) and they worked very well.
Step 3
Cut out your stamped images fairly close to the edges.
Step 4
Take a piece of wax paper and cut it so that it is not any taller than the candle being used and long enough so that it wraps completely around the candle and then some.
Step 5
Take your first stamped image and place it on the candle. Then place the wax paper on top and wrap the wax paper around the candle. Wing out the extra wax paper and pinch close with your fingers making sure the wax paper is tight against the candle.
(kind of like a tight sleeve)
Step 6
Heat up your embossing gun for 30-40 seconds until it is nice and hot. Moving quickly,
(AND NOT TOO CLOSE to the candle or the candle will MELT)
wave it over the area where the stamped image is; be sure to keep the wax paper nice and tight. Every candle will have a different wax melting point, but you should see a change begin to take place within a few seconds. As the candle heats up, the pressure from the wax paper should push the image into the melting wax of the candle, embedding the image and leaving your image intact.Slowly peel the wax paper off the candle. Remember: every brand is different so if you are switching between brands you may need to adjust your heating times a bit.
Step 7
Finish your candle.You can do numerous images on one candle; just place another image and move the wax paper. It is best to try and not use the same spot on the wax paper for each image, but you can use 1 piece of wax paper numerous times.
TIP: Just to be safe - I just threw away the wax paper, and used new wax paper if I was melting another image into the candle.
TIP: I also heard a great tip from someone else. She said if there is a scratch on a wax candle you can "buff" it out with a pair of panty hose.
TIP: Maybe buy a couple very cheap candles (on clearance at Michaels or Hobby Lobby) to practice. After all - I really messed up my first 2 very badly and had to just use them up for my own home (too ugly to give as gifts). But once I got the hang of it...the 3rd time was a charm!
LAST TIP, I PROMISE :-) You can use any embellishment to decorate your candle when you are finished. I especially like the self-adhesive rhinestones and pearls!
Have fun making your own candle and good luck!

Friday, November 14, 2008
Monday, November 3, 2008
Birthday Card for my Brother
This card looks so much better in person - it is so frustrating (my camera - that is). I think I should take my cards downstairs next time I need to take a photo. The light in this room is weird.
Anyhoo...this is a birthday card for my brother. He loves fountain pens - so I thought he'd enjoy this stamp! I am up very late making this card...his birthday is in 2 days!
Supplies:
Paper: Chocolate Chip, More Mustard, Old Olive, Kraft, DSP in middle of brad is Autumn Vine
Stamps: Thinking of Father (retired), That's Nice (retired - inside of card)
Ink: Chocolate Chip, Close to Cocoa
Other: Sponges for sponging both Chocolate Chip and Close to Cocoa around card, Cuttlebug Folder Tiny Bubbles, Build-a-Brad (Stampin Up), Fibers (ribbon stuff) by Adornments

 This is just the inside of the card
 This is just another photo in brighter light.
Friday, October 31, 2008
Eat, Drink, and Be Scary Drinking Jar
Here are the jars I made last night. One is for my friend Jody (although I can't deliver hers until tomorrow...late as usual for me), and the other two are for Eli's teachers. After I took these photos, I put some candy in each jar. I took them to his teachers this morning at our meeting and they loved them. I feel bad I can't get Jody's to her in time for Halloween!!! Why did I not plan ahead???
I honestly can't believe Halloween is HERE!!! I am super excited and happy that today is Halloween - it is SO MUCH FUN - BUT I am bummed I ran out of time to make all the Halloween goodies I wanted to - where does the time go?!
Eli was so cute this morning. He came down the stairs and sounded SO GROWN UP. When he saw my jars, he said "Oh mommy - this sure did turn out nice!" It was just so cute... a little glimpse of how he will be as an adult!
SUPPLIES:
Drinking Jar: Hobby Lobby in glass goods isle, $2.47
Stamp Set: Stampin Up, Eat, Drink, and Be Scary (Holiday Mini 2008)
Paper: Ghostly Greetings DSP, Kiwi Kiss, Pumpkin Pie
Ink: Versamark
Other: Black Embossing Powder, Sticky Strip, stuffing (shreds) from Michael's (gift wrap isle), silver clip from Hobby Lobby, Marvy large punch, ribbon from Michael's


Thursday, October 30, 2008
Wicked Card

 Here is my card inspired by the Broadway musical, Wicked. This one is for you, Caitlin! My niece loves this musical, so I just had to make her this card. I'll be mailing it a little late - I am always so behind.
I wanted the red on the card to "pop" - but it didn't. :-( I accidentally used glitter instead of embossing powder - oops - so it toned it down too much! I wish I had more time to play around with this. Maybe I'll have time in the future to make another card inspired by Wicked. I have so many ideas in my head...just no time right now to do any of them.
SUPPLIES:
Paper: Ghostly Greetings DSP, Basic Black, and Green Galore
Wicked Stamp: From the $1 bin at Michael's!
Ink: Versamark, Real Red
Other: Checkered ribbon from Michael's, SU black embossing powder, Glitter, Marvy Punch, glue dot
Halloween Treat Wooden Bag

 Here is my Halloween Treat Wooden Bag I made for my friend, Laynie. All supplies are from Michael's Craft Store, except the paper and the little piece of solid black ribbon (Stampin Up). It would have been better if I would have sponged the edges of the wood with orange, or painted the thing first. But, unfortunately - I'm a last-minute-type person.
 I put a Wendy's coupon book inside (the proceeds go to adoption - so that is just AWESOME) - oh, and they are only $1 and I also put some candy inside. It doesn't hold a whole lot, but still cute.
Oh - a quick note on how I applied the stickers: I put them on plain Pumpkin Pie CS first, and then trimmed them out, so I could get that have them "coming out" of the bag.
SUPPLIES:
Wooden Bag: Michaels - in wood department (I think it was just $1)
Paper: Ghostly Greetings DSP, Pumpkin Pie, and Vellum
Stickers: (Owl & Crow) Martha Stewart
Stamp: "Boo" Martha Stewart
Ribbon: Michael's (except the little piece of solid black SU Ribbon)
Other: Glue Dots, Mod Podge (to apply the paper to the wood), and sponge to apply the Mod Podge
Eat, Drink, and be Scary Halloween Card - 4 Panel
 3 versions of the same card. The only thing that differs is the button size and/or ribbon.
All stampin up materials, except the buttons and brads.
Stamp Set: Eat, Drink, and be Scary (Holiday Mini Catty 08)
Paper: Black, Kiwi Kiss, Pumpkin Pie, Going Gray, Ballet Blue (I think), Ghostly Greetings DSP
Other: Versamark Pad, Black Embossing Powder, Embroidery Floss, SEI Buttons, Making Memories Brads, Glue Dots, Kiwi Kiss Ribbon (SU)


Monday, October 20, 2008
Ghost "Boo" Halloween Card
Here is the card I made last night. For once, I didn't case (copy) someone else's design, lol! But, I do have to say it takes me FOREVER to come up with an original layout / design and it is sooooo much easier to case. But, every now and then I try to think up my own design, even though it stresses me out (in a good way, I suppose). I hope you enjoy this Halloween Card!
 All supplies Stampin Up, except the ink used on the stars and moons.
Stamp Sets: Pictograms (current catalog), Halloween Backgrounds (2004 retired), Hey Ghoul Friends (2005 retired), Carved and Candlelit (2004 retired).
Paper: Black, Basic Gray (neutrals pack), Vellum, Ghostly Greetings DSP.
Punches: Designer Label, 1 3/8 Circle, Corner Punch, Cropodile.
Ink: Encore Ultimate Metallic Blue, Black Stazon, Pumpkin Pie, Kiwi Kiss.
Black Grosgrain Ribbon.
Saturday, October 18, 2008
I Won a Free Stamp Set!

Okay ya'll - I'm so excited. I entered a contest on the Crazy Stamp Girl's blog and I won! I won the "Love Ya Bunches" stamp set (retired 2007)! Isn't that cool??? She had a contest to see who could help create a place setting for her holiday open house. She wanted the place setting to match the new Stampin Up Designer Paper Ski Slope (above), listed in the Stampin Up Mini Catalog. Here is the link to her blog. For her place setting, I picked out some plates from Anthropolgy that matched the colors in the paper. But, their website doesn't let me copy and paste pictures - so all I can do is give you this link to their web store.
So - I am really excited I won. Now I'm afraid I may become addicted to entering online contests. :-)
Friday, October 10, 2008
Matryoshka Doll Gift Card Holder
http://www.creatingkeepsakes.com/images/stories/magazines/paper_crafts/NovDec_2008/J3pattern.pdf
I haven't made this yet - so no photo. But I hope to make one someday. This link is from Papercrafts magazine.
I was so excited to see a Matryoshka Doll, since we love to collect Russian crafts!
Have fun creating! I'm sure someone out there can beat me to this project, since it is down on my list of things to do.
Hot Cocoa Gift Jar - Great Gift Idea!
 I am so making this! The above is an online project from Papercrafts Magazine (I didn't make it and can't take the credit). But - when I finish mine - I promise to post a photo. I have this stamp stamp set - so yay! It is adorable! And what a great gift!
SUPPLIES: All supplies from Stampin’ Up! unless otherwise noted.
Cardstock: (Bashful Blue, Close to Cocoa, Whisper White);
(White adhesive) Die Cuts With a View
Patterned paper: (snowflakes from Four Seasons collection)
Rubber stamps: (mug, whipped cream, peppermint stick from Like it A Latte set)
Dye ink: (Bashful Blue, Close to Cocoa)
Color media: (colored pencils) no source
Accents: (blue rhinestone brad, iridescent glitter)
Fibers: (brown ribbon, light blue ribbon, blue dotted ribbon)
Adhesive: (foam tape)
Templates: (circle; snowflake embossing)
Provo Craft Dies: (snowflakes, stars)
Provo Craft Tools: (corner rounder punch, 1 1/6" circle punch); (die cut/embossing machine) Provo Craft; (paper crimper) Fiskars; (snowflake punch) no source
Other: (jar) Anchor Hocking
Finished size: 4 1/2" x 5 1/2" x 4 1/2"
ACCENT
ACCENT
1 Stamp mug, whipped cream, and peppermint stick on cardstock; trim, round corners, and ink edges.
2 Stamp mug and whipped cream on cardstock scrap. Color and trim images. Apply glitter to whipped cream.
3 Punch snowflake from cardstock; adhere glitter and attach brad. Adhere to mug with foam tape.
5 Adhere embellished images over stamped image with foam tape. Mat with patterned paper; ink edges. Mat with cardstock.
JAR
JAR
1 Cut cardstock and patterned paper to fit around jar; crimp. Adhere.
2 Cut square from cardstock; emboss. Round corners and ink. Mat with cardstock; adhere. Tie ribbons around jar.
3 Adhere accent with foam tape. Tie on ribbons.
4 Cut circles from cardstock using template; emboss small circle and ink edges. Adhere to lid.
5 Die-cut snowflakes and stars from adhesive cardstock; affix.
Designer Tips
Designer Tips
• Wrap papers and ribbons starting and ending at the front of the jar to hide the ends under the mug design.
• Hide the rhinestone brad tails behind sections of the snowflake.
Bonus Ideas
Bonus Ideas
• Create a Valentine’s Day jar with a pink and brown color scheme and fill it with the recipient’s favorite chocolates or candies
• Fill the jar with flavored coffee for a co-worker’s birthday, job promotion, or retirement gift.
Alternate Product Sources
The Four Seasons patterned paper and Like it A Latte stamp set have been discontinued. Replace the paper with your favorite snowflake paper and try an alternate mug stamp from Stampin’ Up!’s Pun Fun set.
Holiday Gift Ideas
Holiday Gift Ideas
If you love this jar, you’ll find more impressive gifts ideas for your neighbors in the November/December 2008 issue of Paper Crafts magazine. Purchase a copy at www.PaperCraftsMag.com/shop.
Wednesday, October 1, 2008
We Better Get Busy!
• 30 crafting days to Halloween
• 57 crafting days to Thanksgiving
• 85 crafting days to Christmas
WOW! I have sooooo much to do!
• 57 crafting days to Thanksgiving
• 85 crafting days to Christmas
WOW! I have sooooo much to do!
Saturday, September 6, 2008
Always Bird Bella DP Card
And here is the 2nd card we made at our Make-And-Take (class) last night! I really love the way this turned out. I got the idea off Splitcoast - but I really feel I changed enough of the original card to call this my own design. I added the flower, the corner punch, and changed ALL the colors and designer paper choice. I am very proud of it!!! I also used different widths for my paper strips, b/c I wanted them to be fatter. This might look good with pink sponged around the edge of the white paper. Too bad I didn't think of that until now. Enjoy!
Supplies:
Stamp Set: Always
Paper: Bella DP (Stampin Up), Old Olive, Whisper White, Chocolate Chip (for corner punch)
Ink: Riding Hood, Chocolate Chip
Stampin Write Markers: Certainly Celery, Pretty in Pink
Chalk: Pink (to color the flower)
Other: Corner Punch, Dimensionals, Adhesive, Paper Flowers from Archivers

Last Night's Make-And-Take!!!
Last night's Make-And-Take (class) was a success! Thank you guys sooooo much for coming!!!
I had a blast!!! Here is the stuff we made...enjoy!


I had a blast!!! Here is the stuff we made...enjoy!


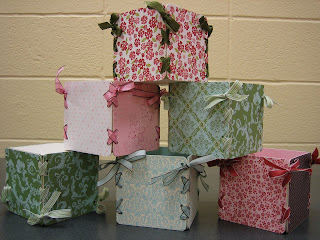
Coaster Gift Box
 Here is my Coaster Box! We made these at my Make-And-Take last night! I was worried they would be too time consuming. They are easy...but they take time! But I worried for nothing...everyone finished. Two gals even made two! So, I am thrilled! I think everyone loved their boxes! It was fun hearing every one's wonderful ideas for what they will be using their boxes for. Jess had the great idea of putting note cards and a pen in one. Hmmm...I will totally be stealing this idea. Other uses for the boxes: potpourri, candy, cotton balls, barrettes, and tea light candles. They really look cuter in person than on this blog (seriously).
For a tutorial on how to do this box, log on to:
http://www.splitcoaststampers.com/ee/index.php/resources/tutorials/coaster_gift_box
The only thing I changed was the glue. I bought the glue they recommended, but I didn't like it. So Shauna (from the SU list serve) recommended Crystal Effects for the glue! Thank you, Shauna! Boy - that was waaaaaay better than the other glue. It worked perfectly.
I bought my coasters from http://www.stamponthis.com/ The service was great - I had my coasters in less than a week! I will be probably be ordering more around Christmas time.
These will be great with Christmas Designer paper and Red Ribbon. Filled with Candy Canes and an ornament...how adorable.
Materials:
Coasters (medium stock) 4x4
Designer Paper, Stampin Up
Ribbon (not Stampin Up - from Archivers)
Mod Podge & Sponges (to glue the paper on the coasters)
Corner Rounder Punch & Small Hole Punch
Crystal Effects (to glue the bottom on)
Mat Pack & Ink Pen (to mark the holes on the edges before punching them out)

Pun Fun Happy Bird Day Card in Kiwi
Here is one of the cards we made at our make-and-take (class) last night! I am thrilled with the results! I got the idea off Splitcoast - but I changed it a little and added the scallop punch and white details. I also added some glitter on the hat for some pizazz. Everyone seemed very happy with their cards they got to take home, so yay! I noticed everyone loved using the Cuttlebug machine and the watercolor brushes.
Stamp Set: Pun Fun
Paper: Kiwi, Pacific Point, Confetti (bird), Whisper White
Ink: Kiwi, Pacific Point (used watercolor brushes), Black Stazon
Ribbon: White
Watercolor Pencils (on hat): orange & yellow
Other: Cuttlebug Happy Birthday EF, Diamond Glitter, dimensionals, adhesive, Scallop Punch, Small Oval Punch, Circle Punch, White Gel Pen

One of a Kind Card with Designer Paper
Here is the card I put together for our Shoebox Swap Meet. I almost typed in Swamp Meat, that is funny. I cut out enough for about 16 of these. Enjoy!
Supplies:
Stamp Set: One of a Kind
Ink: Chocolate Chip
Paper: Chocolate Chip, Chocolate Chip Designer Paper (the retired one), Sage Shadow, Ivory
Ribbon: Very Vanilla 5/8 Grosgrain (Stampin Up)
Other: Dimensionals, Adhesive, Boho Blossoms Punch, Scissors

Supplies:
Stamp Set: One of a Kind
Ink: Chocolate Chip
Paper: Chocolate Chip, Chocolate Chip Designer Paper (the retired one), Sage Shadow, Ivory
Ribbon: Very Vanilla 5/8 Grosgrain (Stampin Up)
Other: Dimensionals, Adhesive, Boho Blossoms Punch, Scissors

Gift From Jeri
I went to Jeri's this afternoon. She gave me these magnets. I LOVE THEM! They both...ahem...hit home, lol!


Gift From Jody
 Jody got me these for my birthday, and I keep forgetting to put them on my blog. Until now. I love these gifts - aren't they fitting for me???
Tuesday, August 19, 2008
Double Line Doodles Card
Jody and I made these a couple months ago and I forgot to add them to my blog. All is Stampin Up! except the "C" Chipboard piece, the buttons, the black brad, and the ribbon. All that stuff is from Archivers.
Stamp Set: Double Line Doodles (Stampin Up)
Paper: Basic Black, Whisper White, Pixie Pink
Ink: Black Stazon - then colored in with Stampin Up markers. Except the pink paisley on pink - that is the Pink Passion ink.
Other: White Gel Pen, Corner Rounder Punch


Stamp Set: Double Line Doodles (Stampin Up)
Paper: Basic Black, Whisper White, Pixie Pink
Ink: Black Stazon - then colored in with Stampin Up markers. Except the pink paisley on pink - that is the Pink Passion ink.
Other: White Gel Pen, Corner Rounder Punch


She's All That Altered Journal
Jody was over a few weeks ago and we made these altered journals. I made the top one and she made the bottom one as a door prize for her baby shower.
Stamp Set: She's All That (mini catty 08 - retired)
Paper: Berry Bliss DP, Close to Cocoa, Very Vanilla (in bottom circle)
Ink: Chocolate Chip
Accessories: Nestabilities Die Cut, SU chocolate chip ribbon (from mini catty), pretty in pink taffeta ribbon, very vanilla grosgrain, hodgepodge hardware, glue stick, spiral punch.


Disney Notebooks
My lovely niece was here a few weekends ago and we had a craft night. We made these altered Disney notebooks, because she loves all things Disney (understatement). Aren't they cute? I am sorry to say that we didn't use much Stampin Up stuff, though *gasp*!!! Well...she wanted to use these Disney stickers she bought at Target - so we worked around the stickers. Then we bought most of the paper at Target, I believe it was Making Memories. Although, we did use Stampin Up Cerise DP on Mickey, and Kraft with Cool Caribbean on Ariel. We also used the Alphadots Stampin Up stamp set with all SU ink. The notebooks were also from Target (Mead). So we started with the notebooks, cut the paper to size, used sticky tape to adhere, and then we embellished the fronts. Enjoy.


Friday, July 4, 2008
Photos From My Very 1st Make & Take - Wa Hoo!
THANK YOU, thank you, thank you - to all of you who attended my VERY FIRST make-and-take! I am just thrilled with the turn out and the response. I felt like everyone enjoyed it (hopefully) - and that is all I can ask for. I am planning another one for August - so stay tuned. I will post the date as soon as I know anything. Suggestions are always welcome too, especially if there is something you'd like to make in the future. *HUGS*


Gift Bag for Dad - Friendly Flowers
Here is a gift bag I made tonight. Eli and I got dad some fishing lures (sort of a very late Father's Day gift), and I thought I should make a gift bag instead of buying one. Well, we were at Target tonight, and I still bought a pack of these gift sacks for $3.99 (I think) for 9 of them (I think) (something like that) - but I altered it with my Stampin Up stuff (as you can see). Boy I wish I had the new scallop border punch. That would have made the top of the bag look really neat. Well, I'll do another one when that comes in, but with a different stamp set, probably. Enjoy!
CS: Ruby Red, Whisper White, Fall Flowers DP
Stamp Set: Friendly Flowers (Retired from the Mini 08), and the "FATHER" stamp is from the All Year Cheer II
Brad: Bold Brights
Ribbon: Kraft Taffeta
Ink: Soft Sky, Ruby Red
Punch: Designer Label and Circle
Other: Paper Piercer

CS: Ruby Red, Whisper White, Fall Flowers DP
Stamp Set: Friendly Flowers (Retired from the Mini 08), and the "FATHER" stamp is from the All Year Cheer II
Brad: Bold Brights
Ribbon: Kraft Taffeta
Ink: Soft Sky, Ruby Red
Punch: Designer Label and Circle
Other: Paper Piercer

May Shoe Box Swap - Friendly Flowers Card
This was the card I designed for the May 30th Shoe Box Swap (my VERY FIRST shoe box swap - how exciting)! I forgot to put this on my blog back in May. The swap went off without a hitch! I was so excited! I cased this idea off Split Coast - but I changed the bottom bit to a designer label and then I changed the background - that is about all I changed. I love this card because it sorta reminds me of an antique quilt. Sorta homey. I sponged around all the ivory edges to give it a distressed look.
CS: Pretty in Pink, Close to Cocoa, Ivory, Chocolate Chip
Stamp Set: Friendly Flowers (Retired, 08 Mini Catalog)
Ink: Chocolate Chip (how easy is that)
Punch: Ticket corner, Designer Label
Brad: Vintage
Ribbon: the chocolate chip stuff from the mini catalog (twill)

CS: Pretty in Pink, Close to Cocoa, Ivory, Chocolate Chip
Stamp Set: Friendly Flowers (Retired, 08 Mini Catalog)
Ink: Chocolate Chip (how easy is that)
Punch: Ticket corner, Designer Label
Brad: Vintage
Ribbon: the chocolate chip stuff from the mini catalog (twill)

Wednesday, July 2, 2008
INTRODUCING a Brand New Product!

INTRODUCING DÉCOR ELEMENTS
Stampin Up!’s new addition to our Definitely Decorative product line! Our Décor Elements designs coordinates with many of our exciting products, so you can combine then to make beautiful, handcrafted home décor pieces. Personalize your surroundings with a variety of exclusive images designed to create a customized unique space. With our self-adhesive vinyl elements (which are easy to apply and remove on walls), you’ll discover how easy and cost effective it can be to do your own decorating! Email me for more information!
Stamp Sets Retiring
Where do stamp sets go when they retire? On a cruise, I guess. Order any set that is retiring on August 10th from me. Email me at marykay@reuschfamily.com
(These sets will no longer be available to order after August 10). If you have an order - please try to get it to me by the 8th or 9th at the latest.
Thank you!
28 Forever in My Heart 109252 $22.95
28 Sealed with a Kiss 109371 $15.95
30 Never-Ending Joy 105038 $18.95
31 Give Thanks 107001 $20.95
31 Peace to the World 109495 $19.95
32 Block Party 109407 $25.95
34 Snow Flurries 107930 $10.95
35 Festive Favorites 107385 $23.95
35 Snowflake Spot, The 106786 $20.95
36 Peaceful Wishes 106754 $23.95
40 Eat Cake 107045 $25.95
48 Be Happy 107009 $20.95
50 Dilly-Dally 109326 $12.95
52 Dare to Be Darling 109379 $12.95
52 Greetings Galore 104477 $30.95
56 Artfully Asian 106772 $23.95
56 Perennial Favorites 107135 $12.95
56 Tagger´s Dozen 108303 $17.95
59 All Through the Year 107315 $17.95
60 Year after Year 109347 $30.95
61 Unfrogettable 106624 $25.95
62 Whale Wishes 109351 $19.95
64 Here, Kitty Kitty 109509 $17.95
64 Yappy Day 109465 $18.95
68 Sweet Thing 109479 $15.95
74 Elementary Essentials 109421 $27.95
86 Polka Dots & Paisley 108549 $18.95
87 Polka Dots & Petals 108551 $17.95
88 Wild Rose 107377 $36.95
92 Bud Basics 106644 $17.95
92 Just Like You 109337 $25.95
93 Two Cute 109385 $12.95
97 So Much 109314 $31.95
99 Blossoms Abound 107363 $23.95
100 Noble Deer 103825 $18.95
100 Wildlife Reserve 107198 $30.95
101 Happy Camper 107151 $31.95
104 Touch of Nature 106322 $27.95
110 Background Basics 100970 $12.95
114 All in a Row 107321 $20.95
114 So Happy 109244 $25.95
116 Big Pieces 108306 $30.95
116 Little Pieces 105063 $17.95
117 Sweet Shapes 106001 $25.95
118 Carte Postale 108249 $25.95
119 Trimtastic 107343 $27.95
124 Office Accoutrement 108541 $31.95
127 Labelicious 109503 $20.95
128 Create a Coupon 107025 $27.95
129 Stamp of Authenticity 106792 $31.95
130 Check It Out 109359 $18.95
130 Property Lines 109286 $19.95
134 French Flair 108321 $17.95
134 Weathered 105276 $17.95
135 Dotted 107179 $17.95
135 Flannel Plaid 106764 $17.95
135 Print Pattern 105167 $17.95
136 Flower Friend 109517 $17.95
136 Word Search 107200 $17.95
138 Amazing to Zany 107185 $41.95
139 A to Z Accents 106766 $17.95
141 It´s Your Birthday 105173 $30.95
143 Circle of Friendship 107137 $17.95
144 Much Appreciated 105169 $13.95
154 Monogram Lower A through Z (all letters) $15.95
159 Best Friends Alpha Lower 107397 $27.95
159 Best Friends Alpha Upper 107399 $27.95
159 Best Friends Numbers 107401 $17.95
159 Rough Edges Mini Alpha 106114 $20.95
D** Glad Tidings 107323 $25.95
D** Snowfall 109234 $23.95
Wednesday, June 25, 2008
Make and Take Tonight - 3 Projects
If you want to see what you'll be making at tonight's Make-and-Take, look at the 3 most recent posts. We'll be making the 4th of July Gift Jar, the Friend Card (Soft Sky), and the Happy 4th Card!
I hope you are excited! They look even more cute in person. See you there!
I hope you are excited! They look even more cute in person. See you there!
4th of July Gift Jar
4th of July Gift Jar! So fun! Full of Hot Tamales!
Stamp Set: Sweet Serendipity
Star Punch
EP: Hologram Highlights
Boho Flower Punch
3/4" Circle Punch
Silver Brads
CS: Naturals Ivory, Not Quite Navy, Real Red DP
Ribbon: Real Red Grosgrain, Silver Cord
Ink: Real Red, Not Quite Navy
Hole Punch
Cutter Kit (distressed the edge)


Stamp Set: Sweet Serendipity
Star Punch
EP: Hologram Highlights
Boho Flower Punch
3/4" Circle Punch
Silver Brads
CS: Naturals Ivory, Not Quite Navy, Real Red DP
Ribbon: Real Red Grosgrain, Silver Cord
Ink: Real Red, Not Quite Navy
Hole Punch
Cutter Kit (distressed the edge)


Friend Card - Soft Sky
Here is a card I made this week. Recipe below.
 Stamp Set: Friendly Flowers (mini catalog 08, retired)
Cuttlebug Folder: Floral Fantasy
CS: Soft Sky, Ruby Red, Whisper White, Wild Wasabi, Fall Flowers DP
Ink: Soft Sky, Ruby Red, Wild Wasabi
Brad: Ruby Red
Ribbon: DS Wild Wasabi
Punch: Designer Label and Circle Punch
Dimensionals
Paper Piercer
 Stamp Set: Friendly Flowers (mini catalog 08, retired)
Cuttlebug Folder: Floral Fantasy
CS: Soft Sky, Ruby Red, Whisper White, Wild Wasabi, Fall Flowers DP
Ink: Soft Sky, Ruby Red, Wild Wasabi
Brad: Ruby Red
Ribbon: DS Wild Wasabi
Punch: Designer Label and Circle Punch
Dimensionals
Paper Piercer
Happy 4th Card
Here is a card I made this week.
Stamp Set: Independence Day
Red Chunky Glitter
Ink: Not Quite Navy
White Gel Pen
Versamark and Silver EP
CS: Not Quite Navy, Real Red, Whisper White
Ribbon: Stampin Up Red Striped

Stamp Set: Independence Day
Red Chunky Glitter
Ink: Not Quite Navy
White Gel Pen
Versamark and Silver EP
CS: Not Quite Navy, Real Red, Whisper White
Ribbon: Stampin Up Red Striped

Friday, June 13, 2008
Kind Thoughts Card - Teal and Black
Goodness me, I am exhausted. I made 15 of these today for the swap tomorrow morning. I am soooo ready for bed. I had no idea these would take so long. I started this morning. I ran into a few problems. The ink (craft) just didn't want to dry. I learned (a little too late) that I should have set it with a heat gun. It all turned out fine - it just took me longer than it should have. Well, I did have one break when my DH took me out for sushi. But other than that, these cards took an entire day. I know they aren't supposed to take that long, LOL!!! But I learned a lot - and next time it won't take me so stinkin long.
I designed this card myself, although I did get the idea for the black background from someone else.
Supplies:
Kind Thoughts Stamp Set, SU!, 2008
CS: Basic Black, Taken With Teal, Whisper White
EP: I tried clear with black craft, then later switched to watermark with black ep (didn't know I even had that until I found some)
Ink: Whisper White Craft, Taken With Teal Classic, Black Craft
Gel Pen: Signo White


Love and Happiness Candle
I made two of these candles. One for Eli's speech teacher and one for his K teacher. I found the candles at Target and I soaked them in a hot bath to get the lable off.
This was my first time using a rub on. It was not hard - but they are sensitive to tearing. I did have a lot of fun doing it! I will make more of these soon. These are great gifts.
Materials:
Candle: Target
Rub On: Stampin Up! Love and Happiness Rub On (retired, Sell-A-Bration 2008)

This was my first time using a rub on. It was not hard - but they are sensitive to tearing. I did have a lot of fun doing it! I will make more of these soon. These are great gifts.
Materials:
Candle: Target
Rub On: Stampin Up! Love and Happiness Rub On (retired, Sell-A-Bration 2008)

Wednesday, June 11, 2008
New Banner!
Do ya'll love my new banner?! I sure do!! I can't take credit for it! Michelle Bowley made it for me - isn't that the sweetest thing? I just love RAKs (random acts of kindness). She asked me what I'd like and I said "I like gerber daisies and I like funky." I think she nailed it. If you'd like to check out her blog the address is http://michellebowley.blogspot.com
Thank you so much, Michelle!
Thank you so much, Michelle!
Thursday, June 5, 2008
My Very First Make-And-Take June 26th
Okay, I took a big leap today. I decided 'yes' - I'm going to have my very own Make-And-Take. I never thought I'd do it! I always wanted to - but worried about how I would accomplish such a task with limited space. Crafting takes up tons and tons of room. You really need a full table just to make one card. Soooo...DH had the idea to find a meeting room somewhere. I did! I am super excited. And nervous. Right now I'm in the planning stage - it's exactly 3 weeks away. I've decided on 3 things for the make-and-take - 2 cards and 1 craft. I'm worried about doing 4 because 1 of the things I'll be teaching is a 3-D item that might be kinda time consuming. So I'm keeping the items to 3. Invitations will be going out soon to people I think might be inclined to be crafty... I will post photos after the make-and-take.
Friday, May 23, 2008
Bunny Paper Clip / Bookmark
Jeri designed this and we made it at her make and take. Just oval punches and round punches for the face and ears. The nose is the spiral punch. I used pink chalk to color in the cheeks and a black Stampin Write Journaler to draw on eyes and freckles.
I think the ribbon is Groovy Guava.
Jeri said she found these jumbo paperclips at Walmart. I found some flatter/thicker ones at Borders that are really cool and I will make some bookmarks out of them and post the photos one of these days.

I think the ribbon is Groovy Guava.
Jeri said she found these jumbo paperclips at Walmart. I found some flatter/thicker ones at Borders that are really cool and I will make some bookmarks out of them and post the photos one of these days.

Subscribe to:
Comments (Atom)