Monday, December 27, 2010

Merry Christmas!

 My son at Bass Pro, sitting on Santa's lap.  Asking for video games, Kung Zhu pets, a scooter, a phone, and a picture of Santa's elves (yes, he really wanted a picture of the elves!)

Merry Christmas to all my blog readers!  {I'm a couple days late!}  Hope everyone had a magical day! 

Tuesday, December 21, 2010

QuicKutz Polar Bear Card

Supplies:  QuicKutz polar bear die, Sizzix snowflake die, red cs, black cs, white, cs, Doodlebug design dsp (red and white stripes), s*e*i WinterSong dsp (used on the snowflake), Tim Holtz tea dye, American Crafts ribbon, adhesive, glue pen.

I love this Polar Bear QuicKutz die!  It is sooooo cute.  And I have to giggle whenever I see polar bears, because my friend Jeri had to make about 100 polar bear cards one time, and by the time she was finished, she was...um...going a little crazy.
Also - I love Red and White............I think it is so crisp.  Enjoy!

Holiday Happiness Card

This is the card we made at Jeri's make-and-take Friday night.  She had the cards planned and cut, and we just assembled!  I love going to make-and-takes!  We used the SU Holiday Happiness Stamp Set, Merry Details Sizzlets, and silver embossing powder.  If you want to see her blog, click HERE.

Peace on Earth in Gold and Red {Jeri's Card}

I didn't make this card, but just wanted to show it on my blog because it is so beautiful.  Jeri made this card and gave it to me - and I just love it!  Click HERE to see her blog.

Sunday, December 19, 2010

Snowflake Card - Northern Frost

Supplies:  White linen, Blue Bazzil, Doodlebug Design glitter paper (snowflakes), Bazzil white prismatic (snow at bottom of card), Northern Frost Decorative Strip Die Cut (snowflakes), adhesive, dimensionals

A very simple winter card.  I cut out supplies today so that school-age children can assemble 30 of these at their Holiday Party.  I wanted to keep it simple for them.  I think they will enjoy making the "snow" at the bottom of the card by tearing the paper to resemble snow.  Other than that, all they have to do is glue the card front on to the base, and then adhere the snowflakes using dimensionals.  They also have to pop out all the tiny little pieces in the snowflakes...although not entirely necessary if they don't want to.  Wish us luck!

JellyPark Card {unfinished}

Supplies:  JellyPark Digi Stamp on etsy.com, Ocean Breeze Bazzil cardstock, white linen, DSP Snow Day by Crate Paper, American Crafts Ribbon, Glue Dots, adhesive

I hope you enjoy my digi card.  The reason it isn't colored is because there are some little ones who want to color it in for me!  So I snapped a photo before the coloring was complete.  I found the digi stamp on etsy after doing a search for a New Year's stamp.  Enjoy!

Banana Bread

Here is the banana bread I made tonight.  I try a new recipe almost every time I make banana bread.  This version reminds me of Debbie Field's recipe, which I also like.  It was very delicious - a keeper for sure.  I've never had cinnamon in banana bread - it added a little warmth.  The recipe is from the Joy of Baking website.  Click here for recipe.  Enjoy!

Wednesday, November 17, 2010

A Link from Somewhat Simple

I usually don't link to other blogs, but this is the cutest idea.  EVER!  Enjoy!
Here is a photo from her blog and also click here to visit her blog (complete with directions).

Thursday, October 28, 2010

Whimsie Doodles Digi Treat Boxes


Supplies:  Whimsie Doodles Digi Stamps "Halloween Minis", Copic Markers, Tangerine Tango, Pumpkin Pie, and White CS, Scallop Punch, Circle Punch, Crop-a-dile (to punch out the circles around the scallop), XL Decorative Label Punch, Fancy Favor Box Bigz Die, Silver Stickles, Orange Stickles, Glossy Accents, DSP My Mind's Eye, and DSP Recollections

The link for the digi stamps can be found here.

I am up at midnight putting together these treat boxes for the teachers tomorrow.  I am chuckling to myself, because I am so tired that I forgot to color in the broom (see above photo)!  Don't worry...I will color it in the morning...but for now I need to hit the hay!

The party favor boxes are really simple to put together.  This die cut is a great investment.  The digi stamps are cute - but they took FOREVER to color.  They are so tiny and there is lots of detail.  I added stickles and glossy accents to make parts of the image pop.  Don't forget to give your project a day to dry.  The glossy accents stays wet for hours.

I'm looking forward to the school Costume Parade tomorrow!

Tuesday, October 26, 2010

A Rocky Mountain Getaway


We just returned from a short trip to Rocky Mountain National Park in Grand Lake, Colorado!  We had a very relaxing getaway.  I was geared up for lots of hiking and wildlife sightings, but unfortunately got very little on both counts.  The temperature was in the low 30's, and it was very muddy, snowy, and wet.  So, it didn't make for good hiking conditions.  We did hike a little, but just not as much as we wanted.  Eli spent most of the time playing in the snow and thought it was neat had a chance to preview the winter snow, before everyone else back home.  We enjoyed watching him play in this winter wonderland.  We were hoping to see moose and elk.  We didn't see any moose, and we only saw about a dozen elk.  And my photos of the elk didn't turn out great.  Bummer!  It was cloudy and overcast each day we were there, and I am not skilled at taking photos in those conditions.  However, I am pleased with my photo of the hawk (above).  I hope you enjoyed this little peak into our Colorado vacation!

Saturday, October 23, 2010

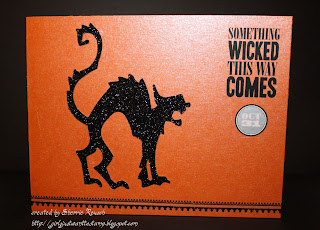
Tim Holtz Scaredy Cat Card

Supplies:  Tim Holtz Bigz Die "Raven and Scaredy Cat", orange glossy card stock, black glitter card stock, Stampin Up Halloween Rub Ons, glue

Are you scared?  Another graphic, yet easy card.  I love this one, too!  Tim Holtz creates fantastic images.  And the Stampin Up rub ons are AWESOME this year.

First, I cut the cat out of black glitter card stock using my Tim Holtz die cut.  Then, I adhered him to the glossy orange card base, using glossy accents as a glue.  Then I adhered the rub on to the bottom, and another one to the right-hand side.

Friday, October 22, 2010

Tim Holtz Raven Card

Supplies:  Tim Holtz Bigz Die Cut "Raven and Scaredy Cat", orange shimmer card stock, black glitter card stock, Stampin Up Halloween Rub ons, glue

I love a simple, graphic card every now and then.  And the best part?  They are easy.  Plus, I REALLY love ravens.  Ravens and owls really make Halloween delightfully dreary.
First, I cut the raven from my Tim Holtz die cut using my glitter paper.  Then I adhered him to the card base using glossy accents (it works as a glue, too).  Then I applied the rub on. 

Thursday, October 21, 2010

Fall Card made from "Fall Set"

Supplies:  Sizzix Textured Impressions Embossing Folder "Fall Set", Core'dinations card stock, natural card stock, sanding block, Stickles (Scattered Straw, Orange Peel, Peeled Paint, Vintage Photo)

Another easy-as-pie card!  These Impressions Embossing Folders really do all the work for you.

To create this card, just emboss and sand your core-dinations card stock (this type of card stock has a different color in the center, so when you sand it down, the core color shows through).  Then adhere the image to your card base.  Then "color" your image with Stickles glitter glue.  Be sure and let the card dry overnight - it stays wet for hours.

Wednesday, October 20, 2010

Pumpkin Plaque Card

Supplies:  "Pumpkin Plaque" stamp by Stampendous, Copic Markers, Black Memento Ink, Tangerine Tango cs, DSP by My Mind's Eye "Boo to You", Trim by Taylored Expressions, white cs

I am surprised at how much I love this stamp!  I bought it on clearance at Michael's, and thought it had some potential.  But, when I started coloring the image, it really came to life.  Lots of character!

First I colored the stamped image with Copics, and then I trimmed the image out and adhered it to a piece of Tangerine Tango.  Then I trimmed around the image again, leaving about 1/8 or 1/16".  I taped the trim by Taylored Expressions to the card base, and then applied the stamped image with dimensionals.

The My Mind's Eye DSP was FREE - hoot!  Well, it was a gift with $50 purchase.  :-)  But I think the moons work so perfectly with this stamped image, it gives it a pumpkin-patch-at-night feel.

Tuesday, October 19, 2010

Chicken Chili

The photo is mine, but no, I didn't create this recipe, but I thought I'd share a good recipe every now and then.  Ya know, the ones I deem share-worthy!  :-)  This is from the Picky Palate website.  Click here to go to the link.  Enjoy!

Southwest Shredded Chicken 3 Bean Chili
4 medium boneless skinless chicken breasts, cooked and shredded
2 Tablespoons extra virgin olive oil
1 large onion, finely chopped
1 large bell pepper, chopped
4 cloves garlic, minced
3 14 oz cans chicken broth
16 oz can black beans, drained
16 oz can red kidney beans, drained
16 oz can canelli beans, drained
15 oz can Muir Glen Fire Roasted Diced Tomatoes
6 oz tomato paste
1 Tablespoon Tabasco hot sauce
1 Tablespoon fresh lime juice
2 heaping Tablespoons chili powder
1 heaping Tablespoon cumin
1 ¼ teaspoon salt
½ teaspoon fresh cracked black pepper

1. Heat olive oil in a large dutch oven over medium heat. Saute onion and bell pepper until softened, about 5 minutes. Stir in garlic and shredded chicken breast; cook for 1 minute then stir in chicken broth, beans, tomatoes, tomato paste, hot sauce, lime juice, chili powder, cumin, salt and pepper. Cook on medium heat for 5 minutes then reduce heat to low and simmer until ready to serve.

Monday, October 18, 2010

Easy Peasy Halloween Card

Supplies:  Bats and Owls Sizzix Texture Impressions Embossing Folders, Core'dinations card stock, SU Pear Pizazz, Martha Stewart Jewels (eyes), sanding block

Oh yeah, by far the easiest card I've ever made!  Love it!  I just ran the Core'dinations card stock through the embossing folder, and then sanded it down until the core color started to show through (you have to buy the Core'dinations card stock in order to get this effect).  Then I attached it to the base card and attached the jewel eyes.  So easy!

Sunday, October 17, 2010

Halloween Spider Matchbox


Supplies:  Bigz XL Die Matchbox, SU XL Decorative Label Punch, Jeweled Halloween Spiders by Personalized by you (I found them at Archivers), acetate sheet (from Office Max), milky way bars, sticky tape, cardstock (not sure...I think I bought it at Michael's last year)

I hope you enjoy my little Halloween candy-bar box!  I wanted to use the matchbox die and see if an acetate window would work with it.  I think it looks nice.  After I punched the label out of the top of the box, I taped some acetate to the back of the window using sticky tape.  I then affixed the spider to the top of the box.

Saturday, October 16, 2010

Retro Halloween Witch Card

Supplies:  Tim Holtz stamps "Retro Halloween", Pebbles Metallic Chalks, Stampin Up Halloween Rub Ons (Sentiment), Black Linen cs, White cs, Black Memento Ink, DSP Martha Stewart (last year's), Glossy Accents, Dimensionals

I love this stamp set!  Tim Holtz makes the coolest retro images.  And, I love my new Pebbles chalk.  They are so creamy and easy to use.  And I know the image doesn't do it justice, but the chalk has a very rich shimmer.  

I stamped the image on white cardstock, colored with the chalk, trimmed the image very closely, then attached to card base using dimensionals.  I applied the SU! rub on to the RH side of the card.  After the card was assembled, I applied Glossy Accents to the witch's hair, eyes, and tooth.  I wish I would have ordered another package of the rub ons!  Love those, too.  I am so happy I found this striped paper in my stash from last year, because it is very retro as well.  I'm very happy with the result.

Saturday, October 2, 2010

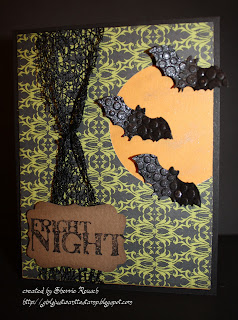
Fright Night Moon Card

Midnight Raven Stamp Set by SU, Cast-a-Spell DSP by SU (retired), More Mustard, Black, and Bazzill Brown cardstock, SU Black Marker, Tiny Bubbles Cuttlebug Embossing Folder, Mesh Ribbon from Taylored Expressions, Pebbles Chalks, Ranger Distress Ink in Pumice Stone, Large Bat Punch by SU, Label Punch by SU, Smooch Spritz in Silver, Large Circle Punch, Black Floss, Glue Dots, Dimensionals

Happy World Cardmaking Day!  Oops, I'm over an hour late!  I tried sooooo hard to get this blog post in before midnight.  
And, my goal was to make 30 Halloween Cards this year, starting with the 1st of October and ending with the 30th.  I already missed the 1st, so the outcome is already looking frightful.
I hope you enjoy my first Halloween card of the season.  Halloween is my favorite time to craft.  I love Christmas, too - but I'm usually too busy during that time of year.
The 1st step of making this card is to punch the circle on the RH side, then adhere a mustard piece of cardstock behind your DSP.  I used Pebble Chalk in dark silver to add a cloud effect on the moon.  It doesn't really show up in the photo. 
The 2nd step is to emboss a piece of black cardstock, and then punch out your bats.  I sprayed them in silver Smooch Spritz and adhered them with glue dots.
The 3rd step is to stamp your sentiment and then punch out the label.  I distressed the edges of the label and the card with Pumice Stone Distress Ink.
The 4th step is to gather the center of the mesh with a piece of floss, and tie with a knot.  You could also use a brad.
The last step is to assemble your card.  Enjoy!

Friday, October 1, 2010

60th Birthday Card

 Occasional Quotes Stamp Set by SU, Versa Magic Jumbo Java Ink, Milestones DSP by Reminisce, Bazzill Brown Medium, Bo Bunny Wild Berry Red Dot, Ivory Linen, Spellbinders Die, Martha Stewart Jewels, Mark Richards Jewels, SU Punch, Maya Road Velvet Point Blossom, Other Paper Flowers from Oriental Trading Co, Smooch Spritz in Gold

Here is a card I made for a friend who is turning 60 next Friday night.  We are going to a crafty, card-making get-together that night, so I can hardly wait to give this to her.  I hope she likes it! 

After I completed this card, I felt it needed a little something.  I just purchased the gold Smooch Spritz today..........so I decided to give it a go!  Without a test run!  I sprayed away, and I really love the result.  It softened the look of the card, and also gave it a more uniform look.

Thursday, September 30, 2010

Bigz Die, Embossing Folder, and Clear Stamp Set Storage


I was in Target a couple days ago and saw these cute media boxes.  I bought these two, intending to use them to organize my Nestability die cuts.  But when I started playing in my craft room, I realized they were a perfect fit for my Bigz Dies, my embossing folders, and my Stampin Up clear stamp sets.
I know you can't tell from the neatly organized boxes, but I really DO hate organizing!  I actually find it completely paralyzing.  But, I always feel better after I do a bit...........even though "a bit" is usually in VERY small doses (unfortunately).  One of these days I would love to be totally organized, but not sure if that will every actually happen.
These were the last two butterfly boxes our Target had, so tomorrow I'm road tripping to another Target in hopes of finding two more.  Still need to store those other die cuts (Nesties and Quickutz).
Hope my little idea will inspire someone out there in blog land. 

Wednesday, September 29, 2010

Halloween Gift Bag by Hero Arts

Baked Shells with Pesto, Mozzarella, and Meat Sauce


I made this dish last week.  It is simple and easy to pull together on a school night.  Plus, it is yummers.  I used ground buffalo, instead of ground beef, and you couldn't tell.  If anything, I like the buffalo better.  Hope you enjoy this if you make it at home.

*From Food & Wine


Ingredients

  • 1  tablespoon(s) cooking oil
  • 1   onion, chopped
  • 1  pound(s) ground beef
  • 2  cup(s) canned chopped tomatoes, drained (from one 28-ounce can)
  • 1 1/2 teaspoon(s) salt
  • 1/2 cup(s) store-bought or homemade pesto
  • 3/4 pound(s) medium pasta shells
  • 6  ounce(s) mozzarella, grated (about 1 1/2 cups)
  • 1/4 cup(s) grated Parmesan

Directions
  1. Heat the oven to 400°F. Oil a large baking dish (about 9 by 13 inches).
  2. In a large stainless-steel frying pan, heat the oil over moderately low heat. Add the onion and cook, stirring occasionally, until starting to soften, about 3 minutes. Stir in the ground beef and cook, breaking it up, until the meat is no longer pink, about 2 minutes. Drain off any excess fat.
  3. Add the tomatoes and salt to the pan and bring to a simmer. Cook until most of the liquid evaporates, about 10 minutes. Remove the pan from the heat and stir in the pesto.
  4. Meanwhile, in a large pot of boiling, salted water, cook the shells until just done, about 10 minutes. Drain and toss with the sauce. Put half of the pasta into the prepared baking dish and top with half the mozzarella and 2 tablespoons of the Parmesan. Repeat with the remaining pasta, mozzarella, and Parmesan. Bake until bubbling, about 15 minutes.
  5. Wine Recommendation: This robust dish with its meat and tomatoes calls for a gutsy red wine from Italy. A Chianti Classico Riserva's medium body, dried-cherry flavor, high acidity and moderate tannins will fill the bill perfectly.

Tuesday, September 28, 2010

Spiced Sweet-Potato Cake with Maple Brown Sugar Icing

This blog post should probably be titled, "Sift your powdered sugar like your momma taught you!"  For realz.  As you can tell...I did NOT.  I thought I could skip that step.  I mean, really...who sifts their sugar?  Apparently...everyone, lol.  OK, I will next time.  I hope you enjoy the recipe on this beautiful fall day.
 
*From November, 2000 Bon Appetit (but I made a couple adjustments)
 
Cake
  • 4 8-ounce red-skinned sweet potatoes(yams)
  • Nonstick vegetable oil spray
  • 2 3/4 cups all purpose flour
  • 3 teaspoons ground cinnamon
  • 2 1/2 teaspoons ground ginger
  • 1/2 t allspice
  • 1/2 t cloves
  • 1 teaspoon baking powder
  • 1 teaspoon baking soda
  • 1/2 teaspoon salt
  • 2 cups sugar
  • 1 cup vegetable oil
  • 4 large eggs
  • 1 teaspoon vanilla extract

Icing
  • 1 cup powdered sugar
  • 3/4 cup (packed) dark brown sugar
  • 1/2 cup whipping cream
  • 1/4 cup (1/2 stick) unsalted butter
  • 1/2 teaspoon vanilla extract
  • 1 teaspoon maple extract

Preparation

For cake:
Pierce sweet potatoes with fork. Microwave on high until very tender, about 8 minutes per side. Cool, peel and mash sweet potatoes.
Position rack in center of oven; preheat to 325°F. Spray 12-cup Bundt pan with nonstick spray, then generously butter pan. Sift flour, cinnamon, ginger, baking powder, baking soda and salt into medium bowl. Measure enough mashed sweet potatoes to equal 2 cups. Transfer to large bowl. Add sugar and oil to sweet potatoes; using electric mixer, beat until smooth. Add eggs 2 at a time, beating well after each addition. Add flour mixture; beat just until blended. Beat in vanilla. Transfer batter to prepared pan. Bake cake until tester inserted near center comes out clean, about 1 hour 5 minutes. Cool cake in pan on rack 15 minutes. Using small knife, cut around sides of pan and center tube to loosen cake. Turn out onto rack; cool completely.
For icing:
Sift powdered sugar into medium bowl. Stir brown sugar, whipping cream and butter in medium saucepan over medium-low heat until butter melts and sugar dissolves. Increase heat to medium-high and bring to boil. Boil 3 minutes, occasionally stirring and swirling pan. Remove from heat and stir in vanilla. Pour brown sugar mixture over powdered sugar. Whisk icing until smooth and lightened in color, about 1 minute. Cool icing until lukewarm and icing falls in heavy ribbon from spoon, whisking often, about 15 minutes. Spoon icing thickly over top of cake, allowing icing to drip down sides of cake. Let stand until icing is firm, at least 1 hour. (Can be prepared 1 day ahead. Cover with cake dome and let stand at room temperature.)

Wednesday, September 22, 2010

Eli's 3rd Grade Science Project

I thought it would be fun to show off Eli's 3rd Grade Science Project on my blog tonight.  He was required to find at least 6 insects, label them, and put them on a nice display.  He wrote three of the labels, and I helped with the rest.  He has a hard time with hand writing, so I am allowed to help if he gets tired. 
The insects are in a shadow box.  I bought some Styrofoam and cut it down to size.  We had to insert the foam upside down because there is glass on the other side of the shadow box, and it just wasn't quite deep enough.  It would have squished the bugs if it was right side up.  PLUS, it is 3rd grade, and it doesn't have to be perfect!
The Cicada Killer and the Praying Mantis were caught in our backyard.  All others were caught in Fort Scott.  Matt and Eli caught the insects.  The scorpion is not an insect, but we thought it was cool, so we mounted it anyway.

Wednesday, September 15, 2010

Holidays Card Workshop by Hero Arts @ Archiver's

Hero Arts Stamps:  Hanging Christmas Ornaments, Joy to All, Merry Christmas Trees, Sending Holiday Cheer, Starry Night; Ink:  Ranger Tinted Embossing Pad, VersaMagic Green Tea, VersaMagic Royal Blue; Embossing Powder:  Ranger Bridal, Ranger Gold Detail, Ranger Lettuce, Ranger Roman Gold, Ranger Snowflake Tinsel, Ranger Silver Detail; Copic Markers; Paper:  Bazzill Coconut Swirl, The Paper Company Shimmer Cardstock (Antique Gold, Arctic Gold, Arctic Snow, Bluebell, crimson, Kiwi); Stickles; Mark Richards dots and gems; Glossy Accents; AC Ribbon; QuicKutz dies; Corner Chomper (deco); Krylon gold and silver leafing pens

I took the Holidays Card Workshop (by Hero Arts) class at Archivers night before last.  These 4 cards were designed by Archiver's.  All I did was assemble, emboss, and color!  It took 2 hours to make these cards.  Most of the time was spent on the ornament card and the gingerbread house card...lots of coloring.
It was a great class!
A very cool thing I learned was embossing with two different embossing powders on one stamped image.  I never thought to do that before.  (Note the tree on the LH side of the tree card.)  I poured "lettuce" embossing powder in the middle of the tree...shook the powder off...then poured Roman Gold embossing powder on the top and bottom of the tree.  Very cool.  The other thing I learned was outlining two of the cards with the Krylon pens.  I probably won't use this trick at home.  Can't decide.  Yes, it looks elegant.  Plus it is very easy to do (and dries super fast).  But I'm a little concerned the look is too "hand-purchased stationary".  I like things to look home-made, of course!
I think my favorite is the ornament card.  I love white on white - plus I love the Glossy Accents!

Thursday, August 26, 2010

Teacher Card in Apple Green

Core'dinations (green), white linen, black linen, apple stamp by Hampton Art, Studio G, "Best Teacher" by Imaginisce, Copic markers YG25, YG67, E50, E25, E13, black Memento ink, Quikutz Apple embossing folder, corner punch, sanding block, Ribbon by TPC Studio

I made this card tonight for Eli's teacher, and will place a "welcome back" note inside.  I plan to make 3 or 4 duplicates, as to have them in my card stash when Teacher Appreciation Day rolls around.
I adore the happy colors in this card and love it when I get a chance to use green (my favorite color).  I also love Core'dinations card stock and how when you emboss and sand, the core color isn't white...it is another color.  It's been a while since I've used my Copic Markers, and it was very nice to have them out again for this project.
By the way...the stamps used for this card were only $1.99 (each)!  The apple was in the "Hot Spot" bin at Archivers ($1.99 bins) and the sentiment stamp is either from Archivers or Michael's, and I'm pretty sure it was the same price.
Have a great weekend!

Thursday, August 19, 2010

Hot Pink and Zebra Personalized Stationary / Invitations

White Linen, Black Linen, Melon Mambo, Designer Paper by gcd studios (Cosette Collection), Black Jewels (Bazzill Blackbird), name printer off on printer, Fiskars Upper Crest border punch, Martha Stewart punch, SU Corner Punch, SU Black Ribbon, Adhesive

I created the card up top last night for my friend, Jessica. She is hosting a bachelorette party for her best friend, and needs to mail out some invitations. She found the below invitation on the internet - and loved it, because her friend loves zebra print (I do too!!!). I think she did a great job picking out an invitation - don't you? She wanted me to duplicate the look. I made the above card, and gave it to her this morning. She loved it! Jessica is going to make the invitations herself, but she is borrowing my punches, and my design. I printed out the measurements for her paper cuts - so she can assemble everything pretty quickly. I think she is going to put all the party information on the inside of the card, since the home-made version opens up (not just a postcard, like the one she found on the internet). This will also leave more room, in case she wants to add a sentence or two. I really enjoyed using my favorite hobby to help a friend in need! I was pleased she asked me for help.

Monday, August 16, 2010

My Swim with the Dolphins

Here I am, getting a dolphin smoochie

I traveled to beautiful Riviera Maya, Mexico last week with my husband and son. We had such a wonderful vacation! We enjoyed many activities such as snorkeling, swimming in the ocean and pool, and also took in a couple day excursions. And most importantly, we were also able to relax and decompress. One of the best experiences I have ever had in any of my travels is swimming with the dolphins. I did it for the first time in 2002, and was lucky enough to do it again a few days ago (Friday the 13th). If you ever have the opportunity to swim with these fun and playful creatures, I highly recommend doing so. To me, they represent the aquatic version of playful little puppies - they are so sweet; only they are more peaceful and graceful. The only bad part of the experience, is that it went by too fast! We swam at a place called "Delphinus" and had an hour in the water. We wanted our son to join in and swim with our group, but he was too standoffish. Children don't realize how large dolphins are until they come close, and they really can be intimidating to a small child. I think he'll be ready in a couple years. I hope you enjoy our photos of our dolphin encounter. I will post more pics from Mexico in a day or two.Our group (they keep the groups very small, average 5 or 6 at a time with the dolphins)
Me doing the "dolphin push". (Two dolphins push your feet so you are pushed across the water.)
My husband getting a dolphin smoochie